An Introduction to AdonisJS
Lately, I've been on a journey of exploring NodeJS as a backend solution - A probe on AdonisJS

Lately, I've been on a journey of exploring NodeJS as a backend solution.
In a recent client project, I was tasked with helping the team choose the bootstrapping tools we would use to build a new backend API from scratch. And for this, we delved into an exploration that led us to a myriad of open possibilities within the node ecosystem, which as we all know can be a daunting task - as we faced the common frustration of trying to frame in the most fitting ORM and framework that satisfies both the project needs and maintainability in the prime of long-term developer experience.
Amongst these, I found AdonisJS to be intriguing enough to look further into. At first glance over the documentation, it felt very familiar to either the Laravel or the Rails developer experience - alas for it favoring the centric MVC architectural approach.
Despite that peaked interest of mine, we did end up advancing with NestJS for that project, under the reasoning that we felt most comfortable with it, and it ticked all the boxes for being an overall good fit for both the team and project customization requirements.
That option stuck with me, in my back-burner log, for a later inspection. Now, having had the time to explore it further, let's jump over for a brief introduction to the framework premise and its main key features.
The premise
At its core, AdonisJS is a Typescript-first framework that emphasizes a structured and opinionated architecture, adhering by default to the Model-View-Controller pattern while allowing flexibility for RESTful or API-centric designs. The framework's HTTP routing and middleware system is declarative and centralized, supporting grouping and middleware piping for efficient request handling. Additionally, its in-house Lucid ORM facilitates database interactions through an active record pattern, simplifying queries with features like eager loading, schema migrations, and factory model traits.
Other standout features include the templating engine, which pre-defaults with EdgeJS and integrates with modern front-end tools like HotWire, Alpine, and Vite - making it compatible with other front-end templating libraries like React and Vue. Service providers enable modular logic organization, enhancing maintainability and reusability, while the built-in dependency injection promotes loose coupling between components.
Adonis also comes prepacked with default and customizable ESLint and Prettier configurations and includes an extensible CLI, node ace, for common development tasks and a lightweight testing framework (Japa) for unit and integration tests.
Intrigued by its potential, I've decided to test AdonisJS myself through a side project, famous last words, to attest to these claims in search of the Javascript oasis.
Experience highlights
From zero to launch
Starting with the ease-ness of project bootstrapping, Adonis has a nice collection of template commands adjusted for its many use cases. Where most commonly you can pass, as an argument, the type of bootstrapping kit you are looking for and the database driver:
// API layers only, with PostgresSQL driver
$ npm init adonisjs@latest -- --db=postgres --kit=api

// WEB kit, with Edge templating and MySql driver
$ npm init adonisjs@latest -- -K=web --db=mysql

// Minimal barebones kit, with only @adonis/core, devoid of the templated defauls.
// e.g) EdgeJS template engine, Lucid ORM, VineJS, Shield and so on.
$ npm init adonisjs@latest -- -K=slim

// Adjusted WEB kit, with Inertia and React, with as SSR strategy
$ npm init adonisjs@latest -- -K=inertia --adapter=react --ssr

// Community templates
$ npm init adonisjs@latest -- -K='github_user/repo'
For my exploratory project, I advanced with the one I was most curious about - the web kit with the Inertia integration with React.
After running the bootstrap command and setting up a base .env file, we can run the yarn dev command to spin up the HTTP local dev server in hot module replacement mode, in which we are then presented with this beautiful bento-like page when accessing it in our local host.
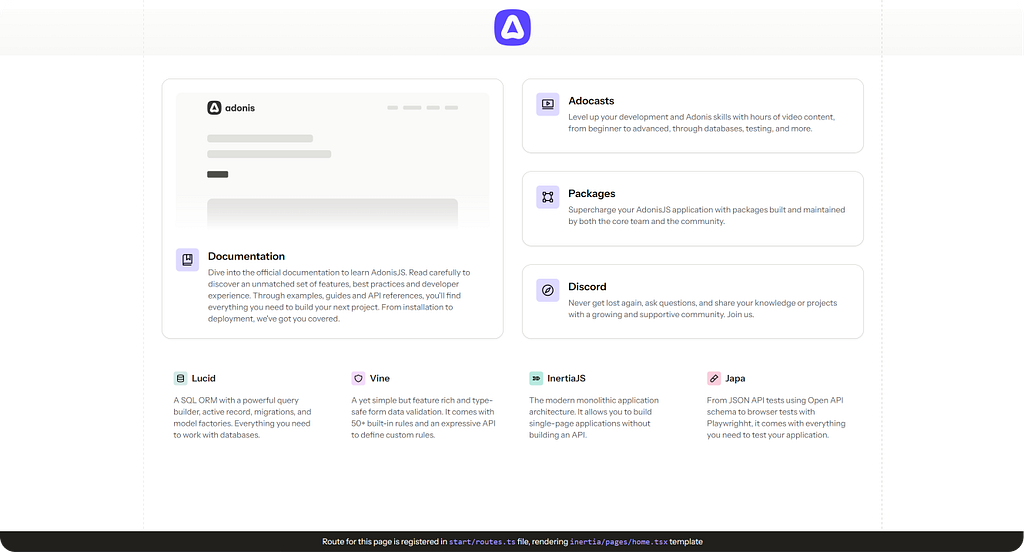
As a curiosity, this home layout is written with Tailwind class utilities, but Tailwind itself is not actually pre-configured in the base scaffold. Tailwind is only contextualized in the base edge root layout template via a CDN link, as well as an embed default template configuration. Leaving it up to you to configure it on the project globally, if desired.
Now that the base scaffold is functional, we can think about mounting it to deploy, as a test on how easy it is to do so. For simplicity purposes, I went for the Fly.io hobby plan, and all I had to do was create a Dockerfile adjusted to the necessary environment requirements to run Adonis, which is already well documented here.
After creating the base container image, all that is left to do is run the install command for the Fly.io cli( brew install flyctl if you are on Mac and like your brew), and follow along with the command deploy prompt steps. Easily enough, after having everything set up, with the app secrets as well, we can then run the fly deploy command to get it to fly.
Piggybacking from this initial Dockerized image for the deployment, we might as well proceed with Docker for our local development setup. For this, I would recommend following this other guide from the version 5 docs for a more guided walkthrough on this setup, which I believe covers most of the bare case necessities. On my own, I actually ran into an issue related to Vite web socket connection defaults, in which I had to apply this particular fix, which explicitly specifies the connection port, to ensure the hot reload workability.
The integration of ESM and Inertia
For those who might not be too familiar with it, Inertia is a unique routing approach that differs from the more common client-side SPA routing like the React Router. Instead of managing navigation entirely on the client state, it collaborates directly with the server.
So when you click on an Inertia Link, it triggers an XHR request to the server, which then the server responds by rendering the needed component and sending back its HTML. Inertia takes this new HTML and updates it on the page DOM without a full reload, providing you with a silky smooth SPA navigation experience. This integration ensures not only a faster development experience but also a more consistent and powerful bridge between backend and frontend development.
Since both sides are part of a Typescript project, sharing types between both the server and client feels natural. However, Inertia presents its own small set of challenges, resolved by the @adonis/inertia adapter, which provides a generic type helper of InferSharedProps<Controller, Method extends keyof Controller>, which takes type sharing to the next level. As you probably deduced right from its type declaration, it takes as an argument the controller and extracts its methods typed returns, either explicit or implicit - providing a very nice and simplified type inference experience as illustrated below:
export default class FeedController {
async index(ctx: HttpContext) {
const page = ctx.request.qs().page || 1
const posts = await Post.query()
.orderBy('updated_at', 'desc')
.preload('user')
.preload('reactions')
.paginate(page, 10)
return ctx.inertia.render('feed', { posts })
}
...
}import { route } from '@izzyjs/route/client'
import { Head } from '@inertiajs/react'
import { CreatePost } from '@/components/posts/create'
import FeedList from '@/components/posts/feed_list'
import type { InferPageProps } from '@adonisjs/inertia/types'
import type FeedController from '#controllers/feed_controller'
export default function Feed({ posts, user }: InferPageProps<FeedController, 'index'>) {
return (
<>
<Head title="Feed" />
<FeedList url={route('feed.show').path} currentUser={user} posts={posts} />
<div className="z-10 fixed left-5 bottom-5">
<CreatePost />
</div>
</>
)
}And you will notice that from my controller, I am only explicitly returning posts. So where does the user prop come from?
Inertia adapter on its own comes pre-bundled with a middleware that pre-populates data extracted from the request context as SharedData, which can be adjusted as required, and it is then implicitly jointly typed with the InferPageProps type.
By default, it comes configured as an empty object, where you can grab the intercepted request context and its intertwined singletons for the authentication, policy bouncer, and so on - to customize these injected props as necessary.
const inertiaConfig = defineConfig({
sharedData: {
user: async (ctx) => ctx.auth?.user || null,
queryParams: (ctx) => ctx.request.qs(),
errors: (ctx) => ctx.session?.flashMessages.get('errors'),
},
...
});server.use([
() => import('#middleware/container_bindings_middleware'),
() => import('@adonisjs/static/static_middleware'),
() => import('@adonisjs/vite/vite_middleware'),
() => import('@adonisjs/inertia/inertia_middleware'),
() => import('@izzyjs/route/izzy_middleware'),
])The pluggable tooling from the in-house brew
Most of this framework's tools are developed to make them easily pluggable into each other. The main team behind these developments is the one working behind the framework itself and its pre-defaulted tools, like Lucid, Vine, Japa, and so on.
Wanted to mention how easy it is to plug in the browser tests with Playwright and Vite without much configuration needed - other than adding a few hooks as described in the documentation. As part of the testing tools, we can easily pull in the built-in helpers for seeding and teardown tests structure, as a global configuration per each test run group, or as here as exemplified, individually as per each test case.
import { UserFactory } from '#database/factories/user_factory'
import testUtils from '@adonisjs/core/services/test_utils'
import { test } from '@japa/runner'
test.group('Accessing the feed', (group) => {
const url = '/feed';
group.each.setup(() => testUtils.db().truncate())
test('Fails to access the feed without being authenticated', async ({ visit }) => {
const page = await visit(url)
await page.assertTextContains('body', 'Sign in')
})
test('Successfully accesses the feed while authenticated', async ({ visit, browserContext }) => {
const user = await UserFactory.create()
const created = await UserFactory.with('posts', 8).create()
await browserContext.loginAs(user)
const page = await visit(url)
const locator = page.locator('.feed-list > article > .post-content')
await page.assertElementsText(
locator,
created.posts.map((post) => post.content)
)
})
...
});/**
* Configure lifecycle function to run before and after all the
* tests.
*
* The setup functions are executed before all the tests
* The teardown functions are executer after all the tests
*/
export const runnerHooks: Required<Pick<Config, 'setup' | 'teardown'>> = {
setup: [
() => testUtils.db().migrate(),
() => testUtils.db().seed(),
],
teardown: [
() => testUtils.db().truncate(),
],
}The developer experience with Lucid.
Even though Lucid isn't inherently type-safe, as explicitly acknowledged by its developers, it has its own set of strengths. While it may not be as popular as other more in-vogue ORMs like Prisma or Drizzle, Lucid's design choices prioritize simplicity and customization over automation. Here are some of its standout features:
- They refrain from making inferred schema changes from the models onto the migrations for added developer customization, so you create your model and respective migration changes independently.
- Built on top of Knex.js, Lucid adopts the active record pattern, making CRUD operations, model relations, and lifecycle hooks intuitive to implement.
- Support of factory traits, a feature uncommon in most NodeJS ORMs, in enabling dynamic data creation for both tests and development seeding.
- A rich ecosystem of add-ons and community support to extend beyond its core capabilities, by offering solutions like soft deletes, grained full-text search, file attachment handling, and so on.
- Query builder pattern that supports expressive queries while maintaining consistency with its Active Record abstraction.
Lucid strikes a balance between ease of use and granular control, making it an enjoyable choice for developers seeking simplicity in database interactions.
The pre-packed VineJS validation capabilities
VineJS is a lightweight form data validation library, also created and maintained by the Adonis core team, and is specially designed for validating object schemas on the server side. On its own, it is pretty extensible, being able to incrementally add the needed rules on top of a schema by following the builder pattern, and create new and custom rules, as well as re-purpose them as macros.
One of the many things that I found to be a gem within it, was how easy it was to implement uniqueness validation callbacks to the DB on the validation layer itself - all by adding a new rule that receives the database connection instance as part of the callback, as to run a query to pre-validate in advance.
Had prior experience with implementing a similar validation check in a NestJS app as a custom-made DTO decorator - that was a bit more cumbersome to accomplish with the framework dependency injection flows in itself. Where I had to delve into a GitHub issue and how to go around solving it. Here, it comes as part of one of its main features, which undoubtedly accelerates development and enhances maintainability by centralizing the validation logic into a schema layer.
import { REGEX } from '#utils/index'
import vine from '@vinejs/vine'
import { Database } from '@adonisjs/lucid/database'
import type { FieldContext } from '@vinejs/vine/types'
/**
* Helper to validate field uniqueness, while excluding current authed user associative records.
*/
async function recordUniq(
db: Database,
value: string,
ctx: FieldContext,
tableName: string,
fieldName: string
) {
const record = await db
.from(tableName)
.whereNot('id', ctx.meta.userId)
.where(fieldName, value)
.first()
return !record
}
/**
* Validates the user update action payload.
*/
export const updateUserValidator = vine.compile(
vine.object({
username: vine
.string()
.trim()
.regex(REGEX.ALPHANUMERIC_STRING)
.unique(async (...ctxParams) => await recordUniq(...ctxParams, 'users', 'username'))
.minLength(1)
.maxLength(50),
email: vine
.string()
.unique(async (...ctxParams) => await recordUniq(...ctxParams, 'users', 'email'))
.email(),
name: vine.string().regex(REGEX.ALPHA_STRING).minLength(1).maxLength(50).nullable(),
surname: vine.string().regex(REGEX.ALPHA_STRING).minLength(1).maxLength(50).nullable(),
avatar: vine.file().nullable(),
cover: vine.file().nullable(),
})
)The node ace command
Another standout feature of AdonisJS is the node ace command and its extensibility, which serves as the developer's main guide during the development process. This powerful CLI simplifies common tasks and ensures you stay aligned with the core conventions of the framework.
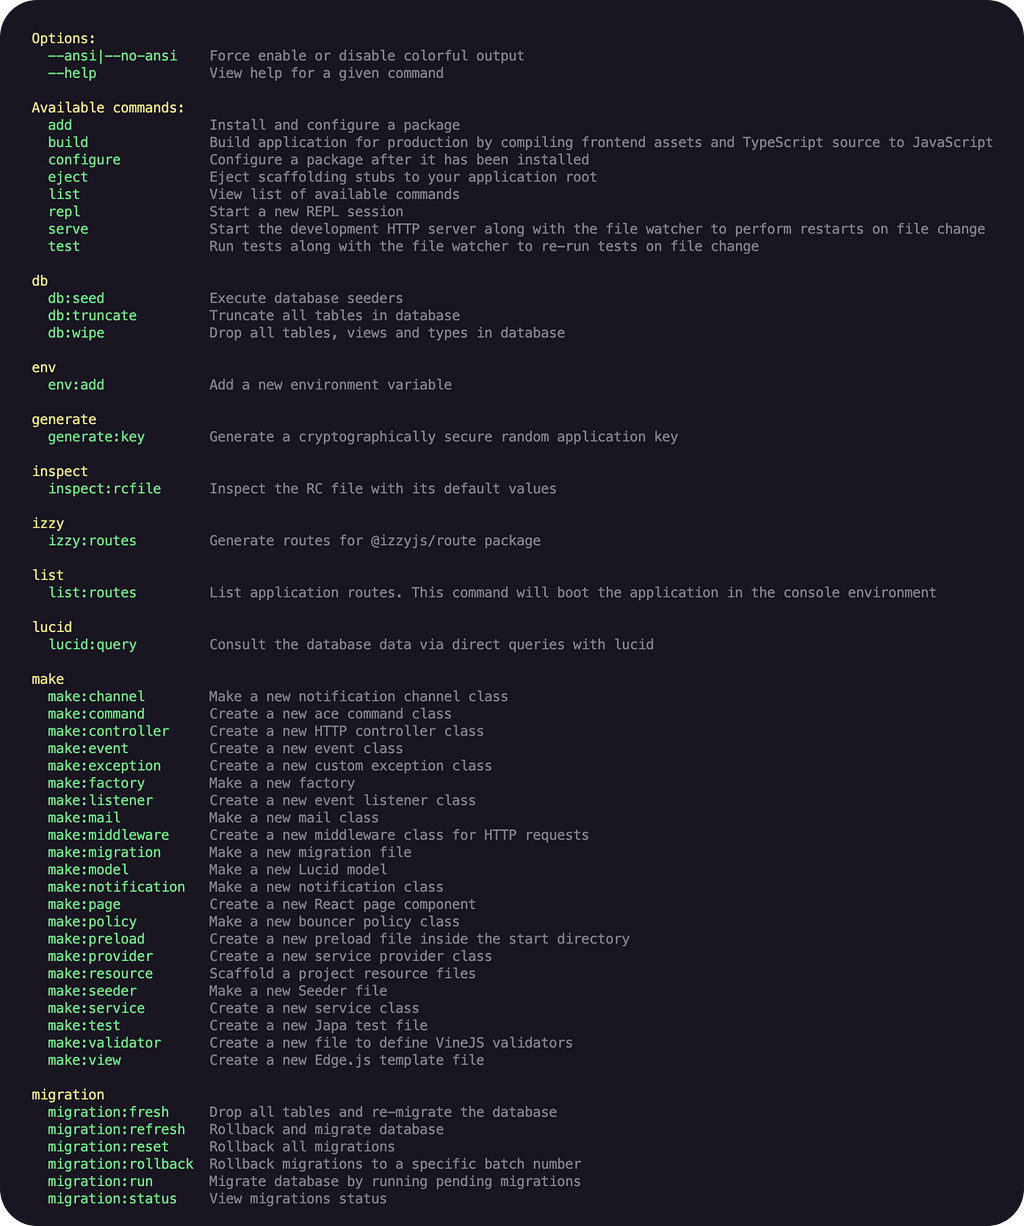
Node ace commands list - both default and custom created
Most pre-packed node ace commands are an excellent starting point for a new AdonisJS project, with the benefit of being extensible and allowing developers to create custom commands adapted to development needs.
So, as per explorations purposes and perceived opportunities, I ended up creating some custom commands to help me in some of my in-regular development tasks, such as:
- Created a command for debugging lucid queries, node ace lucid:query;
- Another command for creating all the files for a new resource, all in one batch, node ace make:resource;
- A command for creating React views of my project's new pages, node ace make:page;
In building custom commands, you can automate repetitive tasks or find other ways to debug issues, as per arising convenience - for a shared project, it can help enforce its long-term maintainability by the team and reduce common DX bottlenecks.
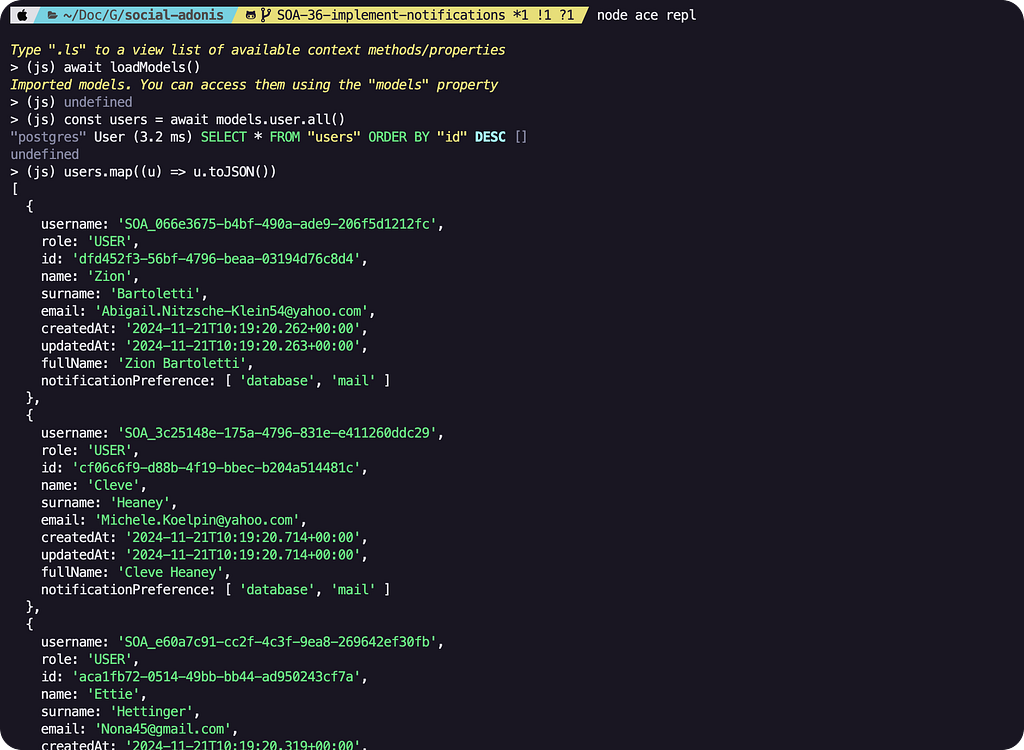
Among the default commands, it's worth highlighting their integration with the Node REPL. Similar to the custom lucid:query command goal, this feature lets you load app models directly into a new REPL session for interactive use. After starting the REPL session, you can invoke a loadModels custom command, use any of the loaded models to fetch the collection from the database into a constant, and then iterate over each proxy instance of the result to serialize it into JSON format.
The Community
Despite its small size, the AdonisJS community is highly proactive, contributing significantly to the framework's ecosystem. A key resource is the official add-ons page at packages.adonisjs.com, where you can easily find and filter packages by version compatibility and category.
For instance, the @adonisjs/auth package supports multiple authentication strategies, including session-based, JWT, and social login support via @adonisjs/ally, packages like @adonisjs/bull for background tasks, @adonisjs/websocket for real-time communication, and @adonisjs/task for cron jobs, and I could go on.
The official forums, Discord channel, and GitHub repositories make it easy to find support and discuss best practices. One of the main highlights of this point is the Adocasts page. It's a community-driven collection of video casts that fulfills the very similar intent of the well-known Laravel equivalent Laracasts and Rails GoRails - in educating newcomers with a collection of screencasts on how to help get started with the framework.
In short, the AdonisJS community provides the tools, support, and resources you need to build efficiently, where you will most likely find a ready pluggable solution for it.
In conclusion
There's still plenty more I would like to keep exploring within the framework - I, myself, found Adonis to be a hidden gem within the node ecosystem, with plenty of growth potential.
Alas, perhaps, wouldn't say that it is the de facto framework for every existent use case you might come across, even though it is well prepared for it. I would say, though, that it is a big contender for being your full stack in JS framework - at least if you are looking for a more opinionated and structured monolithic approach in a NodeJS\-only full-stack project.
And putting on my hat of thinking less as a frame worker and more as a solution researcher - there are plenty of different ways one could go around creating a custom-made full-stack solution in JS, way too many even. Adonis is another one, but with the added speed that comes with having enforced conventions on how to solve the most common and pre-existing problems. I found it to be a very necessary addition to the ecosystem itself, where it is currently very easy to stray and overthink the same solutions, time and time again.
Hope to have at least made you curious about trying it out, and as for myself, I will keep exploring it myself in my side project, and who knows - maybe contribute to the community in the near future. 😉
If you are curious about my discovery journey, you can accompany it on my public GitHub repository, here.
Useful links:
https://docs.adonisjs.com/guides/preface/introduction
https://lucid.adonisjs.com/docs/introduction
https://japa.dev/docs/introduction
https://vinejs.dev/docs/introduction
https://docs.adonisjs.com/guides/getting-started/deployment#creating-a-docker-image
https://v5-docs.adonisjs.com/cookbooks/dockerizing-adonis
https://packages.adonisjs.com/